Thursday, January 31, 2013

The wire button tree - Tutorial


 A friend recently asked me to make a wire button tree for her. She wanted a similar button tree with the one in this tutorial:

http://craftandcreativity.com/blog/2013/01/12/buttontree/

The idea is really nice, but I must say I've encountered some difficulties in making the tree, so I said to my self I should make another tutorial with more detailed information.

You can see the list of supplies in the picture below:


A few tips on the supplies:

- in the original tutorial, 0.5 mm thick wire was used so I've bought the same. The shop where I've found it had no idea of the softness of the wire and it turned out to be a bit on the hard side, making it difficult to manipulate in groups of 40....so look for softer wire if possible:)

- I used around 20m of wire for one tree that turned out to be approximately 30 cm high and 20 cm wide; roughly the size of an A4 sheet of paper 

- also, the first tutorial uses 21 buttons, grouped in 7 branches of 3 buttons each. I think you can use as many as you like and as colorful as you want, but still, in my opinion, the tree looks better if it is not symmetric

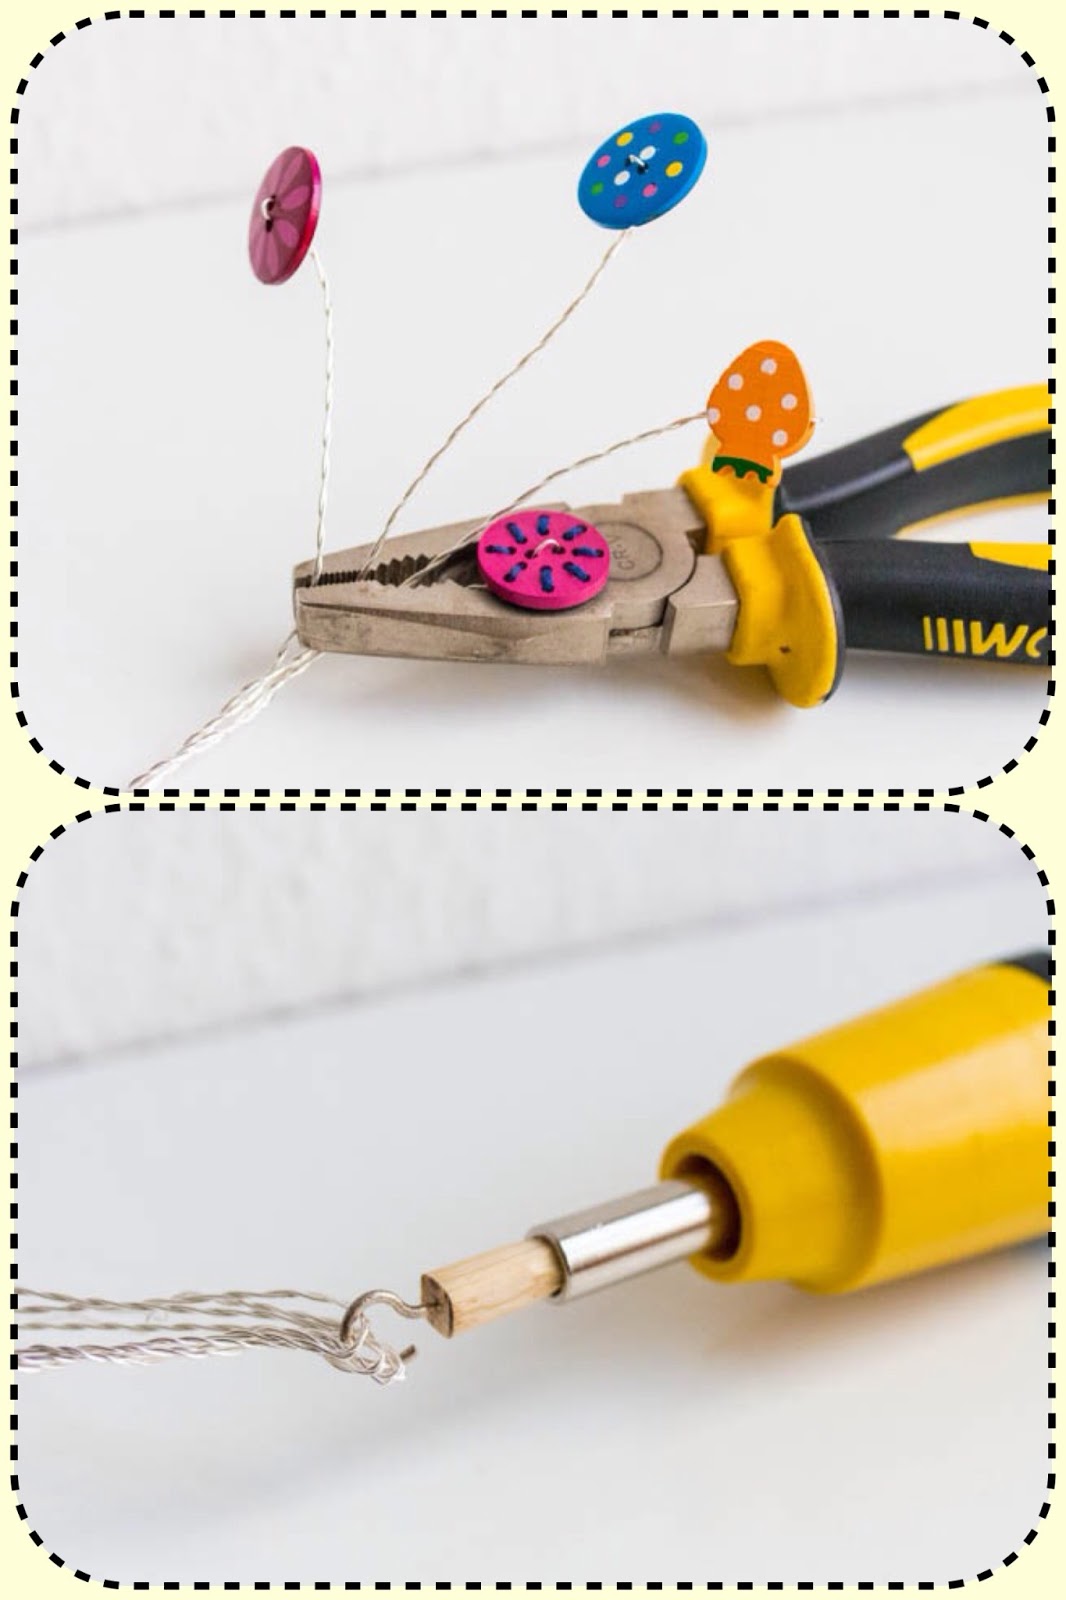
- the electric screwdriver: the one in the pictures numbered with 1 and 2 is from the original tutorial (photo credits http://craftandcreativity.com/blog/) where a metal hook that fit the screwdrivers's head was used

- time needed: approximately 1.5 h for one tree.

I didn't have that, so my husband made a custom tool for me, by inserting a metal hook into a small cilinder of wood and using a knife to cut the wood to fit the screwdriver's head.


Step 1:

- choose the buttons, lets say 21 pieces
- cut 21 pieces of wire, 90 cm long
- insert the wires through the buttons' holes

Step 2:

- for each button, attach the loose ends of the wire to the metal hook by a small loop, as seen in the photo below
- holding the button firmly into one hand, and the screwdriver in the other, push the button of the tool using the lowest speed setting, until the wire is twisted on the entire length

Use a marker to make a dot on the button you are using so all the wires will be twisted in the same direction!!!


Step 3:

- now you have 21 buttons set on twisted wire
- use your hands to make an extra twist at the back of the buttons, to keep these from moving (optional)
- choose you 7 combinations of 3 buttons each
- for each branch, make a loop for the loose ends of the 3 wires and attach it to the screwdriver's head
- using the flat nose pliers hold tightly of the 3 wires in the point where you want the twisting to end and the branches to go separately (like in the picture below)
- use a piece of folded paper between the plier's noses for better adherence (optional)
- follow the same twisting procedure as seen in Step 2, being careful not to twist as hard as the first time


Step 4:

- assemble the tree starting from the top
- take the branch you choose to be the top of the tree and the one for the second higher branch, wrapping this last one around the top one till you have just enough left for the roots
- take the third branch and wrap it around the two from the previous step and so on, wrap the branches one by one till all 7 are ready

The first time around, you can use one of my pics or the one in the first tutorial as guidance for the placement of the branches. I did, so my first tree turned out similar with the original one, but I am using my imagination for the next:)

I must also warn you (and this is why I've suggested using a softer wire), I needed a little help from my husband to put together the tree in it's final shape.


 Step 5:
- cut the roots being careful to keep them long enough to support the height and weight of the tree 
- arrange the buttons in the desired position


Enjoy!

Take a few minutes and pay a visit to the amazing blog that gave me this idea, it has lots and lots of beautiful crafting tutorials!


Tuesday, January 22, 2013

First adventure into shrink plastic world

I wanted to try this wonderful material for so long now, I can't even remember.

A long time ago, I had received a clear sheet of plastic from a swap partner. It was a piece of shrink plastic and I had no idea what to do with it.


After researching a bit online I decided it was something worth exploring, and, as it wasn't expensive material, ordered some online, both the clear and the white type. The one I use is called Shrinkles. I like is a lot, it doesn't seem to distort or ruin the drawing in any way after shrinking.

I know there are so many online resources that offer tips and tricks about it, so I'll stick to sharing what I've found out from my own experience:)

First of all, the plastic I use shrinks to about 41% of the original drawing, so you need to take this into consideration when deciding what project to make.

The white sheets of plastic come already roughened on one side, so you would want to use this for coloring. Be careful though when using markers, as these will bleed through the small scratches of the surface. It is fine for one color design, because when you cut around the edges of your drawing you can  remove the bleeding color that exceeds these limits.

For a more complicated design I'd recommend using colored pencils. I use some old ones I've had since childhood and it works great. Only tried using pencils on the roughened side as I don't think the color will adhere on the shiny side.


These cute mushrooms are entirely colored with pencils. I like using a marker for accents and a more tridimensional look. I think the texture created by the pencils on the plastic surface is really neat! Love this rough, rustic, handmade touch:)

Be sure to use clear varnish to seal the design after baking:) I use a solvent free varnish, the same one I use for decoupage technique. Already tried the one I use for Fimo and it smudges all the marker away:(

Another "problem" I stumbled upon is that some markers will leave strikes of excess color when used on the shiny side of plastic.


For me it is not exactly a problem as I like the handmade texture that this adds to a design, but just in case, test your markers on a scrap of plastic before. Don't worry if the marker leaves a bit of stroke marks, I've only been able to see these in a very zoomed-in picture.

Regarding acrylic paints, from what I've experiences, they don't work. They rub off quite easily after baking, like sunburned skin:)

Ok.....when it comes to cutting, I recommend using a sharp detail scissors and try to rotate the plastic to cut the desired shape rather than the scissors. In really narrow angles try to achieve the v-shape by cutting from both directions till the cuts meet. Think the girl's above underarm v-space.

Careful! If you try to make this kind of cut from a single move, most probably the plastic will crack in the tip of the angle:(


Or use the same technique for the sharp v of these speech bubbles. Aren't these the cutest greetings?


If you have only clear plastic, you have two options: lightly sand it on one side for a frosted look (see the speech bubbles) and for better adherence of color, or use it as it is. If you take the second option, you can use the finish result with the right side being the uncolored one, by this giving it a glass 3D effect.

I have no example of my own for this but I hope you get what I mean:)

One last thing...when using pencils, always color with them as step one and add the marker details after, to prevent smudging. When using only markers...mmmm.. haven't decided yet, I guess you'll have to try and decide for your self :D.

As glue for adding jewelry findings I got best results using a glue called Poxipol, I don't really like the E6000. You have to try see what works best for you.

Well, that's it for now, hope you find my tips useful and please check out my handmade goodies in my Etsy shop (top right of page:).

For more infos on using shrinkies, here are some useful links:


I would love to hear about your adventures with shrink plastic, have you tried it yet?


Related Posts Plugin for WordPress, Blogger...