Showing posts with label handmade. Show all posts

Tuesday, January 22, 2013

First adventure into shrink plastic world

I wanted to try this wonderful material for so long now, I can't even remember.

A long time ago, I had received a clear sheet of plastic from a swap partner. It was a piece of shrink plastic and I had no idea what to do with it.


After researching a bit online I decided it was something worth exploring, and, as it wasn't expensive material, ordered some online, both the clear and the white type. The one I use is called Shrinkles. I like is a lot, it doesn't seem to distort or ruin the drawing in any way after shrinking.

I know there are so many online resources that offer tips and tricks about it, so I'll stick to sharing what I've found out from my own experience:)

First of all, the plastic I use shrinks to about 41% of the original drawing, so you need to take this into consideration when deciding what project to make.

The white sheets of plastic come already roughened on one side, so you would want to use this for coloring. Be careful though when using markers, as these will bleed through the small scratches of the surface. It is fine for one color design, because when you cut around the edges of your drawing you can  remove the bleeding color that exceeds these limits.

For a more complicated design I'd recommend using colored pencils. I use some old ones I've had since childhood and it works great. Only tried using pencils on the roughened side as I don't think the color will adhere on the shiny side.


These cute mushrooms are entirely colored with pencils. I like using a marker for accents and a more tridimensional look. I think the texture created by the pencils on the plastic surface is really neat! Love this rough, rustic, handmade touch:)

Be sure to use clear varnish to seal the design after baking:) I use a solvent free varnish, the same one I use for decoupage technique. Already tried the one I use for Fimo and it smudges all the marker away:(

Another "problem" I stumbled upon is that some markers will leave strikes of excess color when used on the shiny side of plastic.


For me it is not exactly a problem as I like the handmade texture that this adds to a design, but just in case, test your markers on a scrap of plastic before. Don't worry if the marker leaves a bit of stroke marks, I've only been able to see these in a very zoomed-in picture.

Regarding acrylic paints, from what I've experiences, they don't work. They rub off quite easily after baking, like sunburned skin:)

Ok.....when it comes to cutting, I recommend using a sharp detail scissors and try to rotate the plastic to cut the desired shape rather than the scissors. In really narrow angles try to achieve the v-shape by cutting from both directions till the cuts meet. Think the girl's above underarm v-space.

Careful! If you try to make this kind of cut from a single move, most probably the plastic will crack in the tip of the angle:(


Or use the same technique for the sharp v of these speech bubbles. Aren't these the cutest greetings?


If you have only clear plastic, you have two options: lightly sand it on one side for a frosted look (see the speech bubbles) and for better adherence of color, or use it as it is. If you take the second option, you can use the finish result with the right side being the uncolored one, by this giving it a glass 3D effect.

I have no example of my own for this but I hope you get what I mean:)

One last thing...when using pencils, always color with them as step one and add the marker details after, to prevent smudging. When using only markers...mmmm.. haven't decided yet, I guess you'll have to try and decide for your self :D.

As glue for adding jewelry findings I got best results using a glue called Poxipol, I don't really like the E6000. You have to try see what works best for you.

Well, that's it for now, hope you find my tips useful and please check out my handmade goodies in my Etsy shop (top right of page:).

For more infos on using shrinkies, here are some useful links:


I would love to hear about your adventures with shrink plastic, have you tried it yet?


Sunday, October 7, 2012

October search for color inspiration

 I love autumn. My creative juices seem to flow better while the skies are gloomy and it's raining cats and dogs. 
This weekend, my hubby and I payed a visit to the miniature version of our city's big flea market, the neighborhood's small-but-full-of-hidden-treasures market.
The clouds were hanging heavy on the led sky and we knew we had to hurry. Only a few tables were full with the usual second (or third) hand stuff: clothes, bags, toys, cutlery, paintings, a pair of vintage Dior sunglases, jewelry and some vintage camera lenses.


At this last table, my husband lingered more than the usual 30 seconds, so I knew he must have found something very interesting. He bought two lenses, a 1973's Soligor 28 mm 2.8 and a 1983's Helios44m 56mm.


Now, those numbers didn't mean much to me then, but, as we got home soaked by the pouring rain that had just started, I've decided I wanted to learn more.


So when the storm toned down, we went to a walk around the block, to test the camera by taking some shots that were on my autumn photo check list for a while...
A reason why I love this season so much is because whenever my inspiration levels are low, all I have to do is take my camera and go outside.    


We live close to the forest but the beauty of fall is that every little plant that I wouldn't normally notice has something to show off for, so a walk around the neighborhood will do.


The colors and textures of foliage and fruits in the trees are amazing. I like watching all the transformations plants go through and taking photo samples of their color palletes.
It was a very good opportunity to test my new polka dots rainboots, also:)


Don't you think autumn is the coziest of seasons, with the sweaters, wool socks, hot cocoa, umbrellas, fog, rain, warm colors, hoodies and boots?


All these photos we taken with the Soligor prime lens (except the flying birds one, ©Elle Moss), and I must say, the 10 euros Atti payed for it were a bargain! It takes very crisp shots and the manual focusing is definitely more satisfying then the automatic one.


So, by the time it was dark, I had ended up with these photos and some brand new crafting ideas for my shop:)


You can find the felted acorns featured above (and more handmade rustic home decor) in my Etsy shophere.


Thursday, February 9, 2012

Zakka Sewing Love Story

It`s been a while since my last posts, but I have an excuse: I`ve been busy sewing:).

I`m all into pouches and totes, cutting beautiful, shabby chic fabrics and then sewing them together makes me happy.

On my last trip to Ikea I`ve bought some canvas in a gorgeous, warm caffe au lait neutral shade and  a red and pink toned floral fabric that`s simply delicious eye candy.

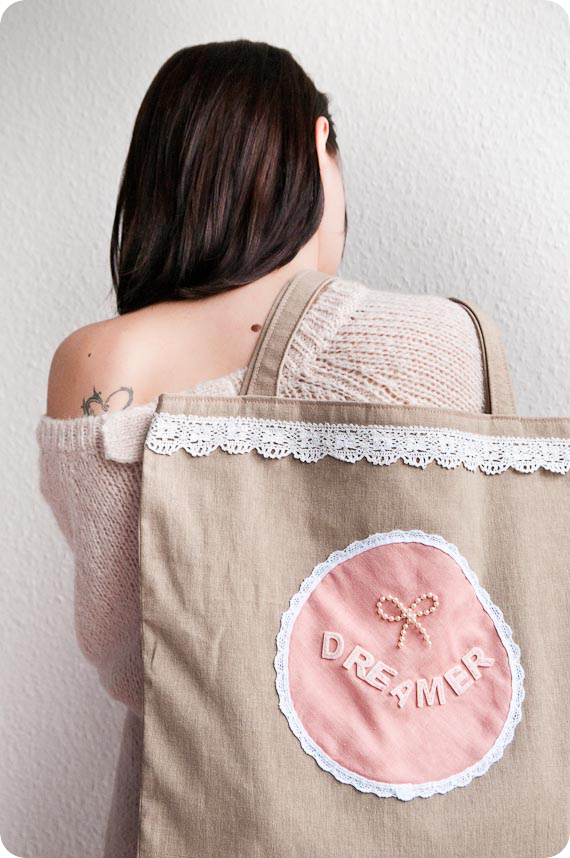
The first thing (that I wanted to make for a long time) was to prepare to sew a romantic/zakka tote in which to use some vintage lace that I love and have laying around for ages.

I think it turned out great, what do you think?


It turned out to be reversible, has an interior pocket from the same floral material, and, of course, the lace trimming I`ve been telling you about.

I am a really big sucker for small cute zakka details, so the front side of the tote got adorned with a vintage, salmon pink doily bought at the flea market. It seemed to me that the entire ensemble goes perfectly with some pearls so the little bow was born.

I used to dream about this bag, so the word "dreamer" seamed right at home:)

This tote is available in my Etsy shop, here.


* * *

I love everything about zakka!!!!! And this is an understatement!


I didn`t know what it ment till about 2 months ago, when I stumbled upon the word on a random blog. I know, I don`t think there is anyone out there, involved in crafting, that doesn`t know about it, but maybe, just maybe, there is, so I promise to come back and talk more about it in another post:)

But, as I was reading some zakka blogs (mostly japanese, which I loooove, japanese crafting blogs are the best by far) I`ve seen all kinds of cute pouches and suddenly felt like making some of my own ideas:).

I wanted one more romantic and shabby like, and one more elegant, lacy and with a vintage air to it.

The collection was named "Sewing Love Story", after the irresistibly cute zakka labels that say "Sewing Story" (bought on Etsy).

So, here they are!!

This is the first one, made from canvas-floral fabric combo and, of course, the sweet little details:


quilted with protective felt


Available here.


The second one was sewn from a vintage fabric I had for a long time now; it didn`t seem to work for any  project till now:)

I love the delicate print and the color combo, I think it goes perfectly with the macrame trim and the shell button. The pearly ribbon fits right at home with the corn flower blue zipper:)

Do you like it? It has two interior pockets (credit card size) and it is large enough to fit your most loved treasures that you carry with you everywhere.


When I bought the "Sewing story" labels, Jessie from RetroNaNa was very nice to add some extra tags, like the one I used here to adorn the inside of the pouch.


Available here.


I`ve also made one pouch inspired by a traditional romanian costume, but I keep the secret for the next time:)

I would be thrilled to hear what you think of my sewing adventures so far ;)

Thanks, Hugz!


Monday, October 31, 2011

10 Sewing tutorials for beginners


Learn how to sew a simple zippered case, by Design Sponge.

Go to the tutorial here.


Chic wrist cuff, from J*Casa Handmade`s blog


Find the tutorial here.


Get your sewing supplies together is these extra cute
storage buckets from Handmade Matters.

Find the tutorial in the link above:)


Decorate your couch with this colorful Scrap buster fall pillow by Cluck Cluck Sew.

Get to the tutorial here


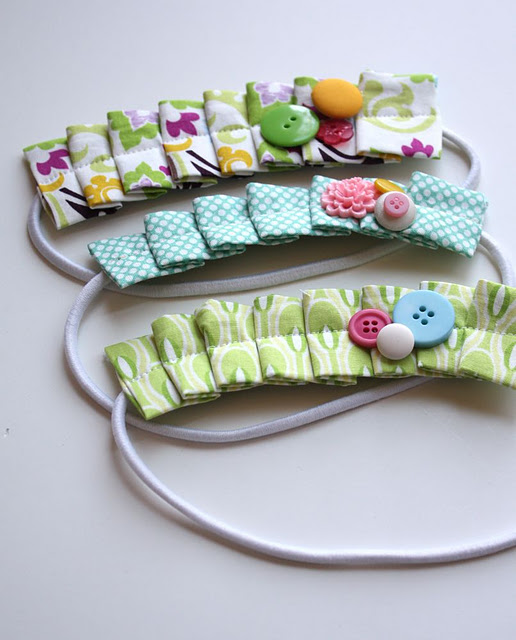
I plan to make myself a few of these sweeet pleated headbands from Craftiness is not optional:)

Get the amazing tutorial here.


Prepare some Stitched Christmas Cards  as shown by this Craft Blog.   

See the tutorial here.


This Picnic Caddy from Snowy Bliss would make a great gift for someone who enjoys eating outdoors:)

Get the know how here.


Ever wanted a box pouch? This one is not only easy to make but will surely cheer up your day with it`s bright colors and happy pattern:)

Find the tutorial here:)


I love reinventing old boring t-shirts or cardigans.
Here is one option to do just that:)

Learn how to make a Rose Petal Tee here.


Make something cute and useful for your or your friend`s baby:)

Learn how to sew these pacifier clips from How about Orange, go to the tutorial here.


These are 10 sewing tutorials perfect for beginners. Go and check out these amazingly creative blogs and get inspired! For the above projects you can use any left-over fabrics with great attractive patterns, or just simple plain colorful ones:)

Hope you enjoy these!
Will be back with some felted goodness!

Hugs!


Related Posts Plugin for WordPress, Blogger...