Thursday, January 31, 2013

The wire button tree - Tutorial


 A friend recently asked me to make a wire button tree for her. She wanted a similar button tree with the one in this tutorial:

http://craftandcreativity.com/blog/2013/01/12/buttontree/

The idea is really nice, but I must say I've encountered some difficulties in making the tree, so I said to my self I should make another tutorial with more detailed information.

You can see the list of supplies in the picture below:


A few tips on the supplies:

- in the original tutorial, 0.5 mm thick wire was used so I've bought the same. The shop where I've found it had no idea of the softness of the wire and it turned out to be a bit on the hard side, making it difficult to manipulate in groups of 40....so look for softer wire if possible:)

- I used around 20m of wire for one tree that turned out to be approximately 30 cm high and 20 cm wide; roughly the size of an A4 sheet of paper 

- also, the first tutorial uses 21 buttons, grouped in 7 branches of 3 buttons each. I think you can use as many as you like and as colorful as you want, but still, in my opinion, the tree looks better if it is not symmetric

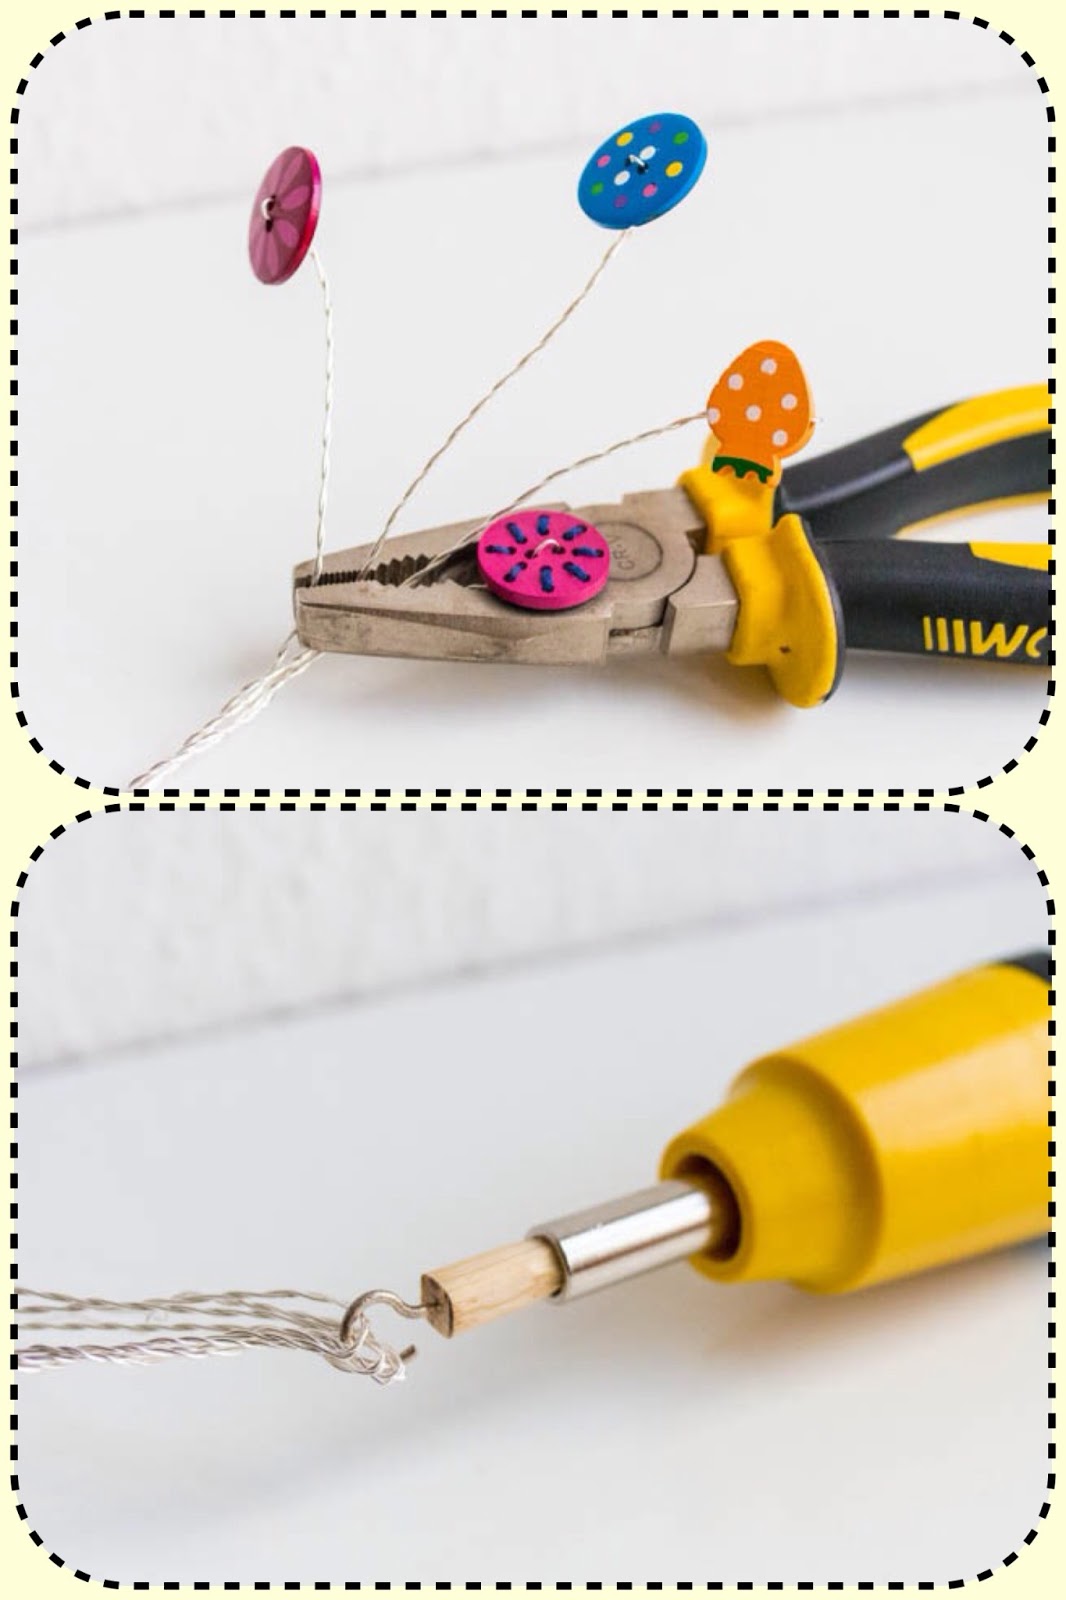
- the electric screwdriver: the one in the pictures numbered with 1 and 2 is from the original tutorial (photo credits http://craftandcreativity.com/blog/) where a metal hook that fit the screwdrivers's head was used

- time needed: approximately 1.5 h for one tree.

I didn't have that, so my husband made a custom tool for me, by inserting a metal hook into a small cilinder of wood and using a knife to cut the wood to fit the screwdriver's head.


Step 1:

- choose the buttons, lets say 21 pieces
- cut 21 pieces of wire, 90 cm long
- insert the wires through the buttons' holes

Step 2:

- for each button, attach the loose ends of the wire to the metal hook by a small loop, as seen in the photo below
- holding the button firmly into one hand, and the screwdriver in the other, push the button of the tool using the lowest speed setting, until the wire is twisted on the entire length

Use a marker to make a dot on the button you are using so all the wires will be twisted in the same direction!!!


Step 3:

- now you have 21 buttons set on twisted wire
- use your hands to make an extra twist at the back of the buttons, to keep these from moving (optional)
- choose you 7 combinations of 3 buttons each
- for each branch, make a loop for the loose ends of the 3 wires and attach it to the screwdriver's head
- using the flat nose pliers hold tightly of the 3 wires in the point where you want the twisting to end and the branches to go separately (like in the picture below)
- use a piece of folded paper between the plier's noses for better adherence (optional)
- follow the same twisting procedure as seen in Step 2, being careful not to twist as hard as the first time

Step 4:

- assemble the tree starting from the top
- take the branch you choose to be the top of the tree and the one for the second higher branch, wrapping this last one around the top one till you have just enough left for the roots
- take the third branch and wrap it around the two from the previous step and so on, wrap the branches one by one till all 7 are ready

The first time around, you can use one of my pics or the one in the first tutorial as guidance for the placement of the branches. I did, so my first tree turned out similar with the original one, but I am using my imagination for the next:)

I must also warn you (and this is why I've suggested using a softer wire), I needed a little help from my husband to put together the tree in it's final shape.


 Step 5:
- cut the roots being careful to keep them long enough to support the height and weight of the tree 
- arrange the buttons in the desired position


Enjoy!

Take a few minutes and pay a visit to the amazing blog that gave me this idea, it has lots and lots of beautiful crafting tutorials!


Tuesday, January 22, 2013

First adventure into shrink plastic world

I wanted to try this wonderful material for so long now, I can't even remember.

A long time ago, I had received a clear sheet of plastic from a swap partner. It was a piece of shrink plastic and I had no idea what to do with it.


After researching a bit online I decided it was something worth exploring, and, as it wasn't expensive material, ordered some online, both the clear and the white type. The one I use is called Shrinkles. I like is a lot, it doesn't seem to distort or ruin the drawing in any way after shrinking.

I know there are so many online resources that offer tips and tricks about it, so I'll stick to sharing what I've found out from my own experience:)

First of all, the plastic I use shrinks to about 41% of the original drawing, so you need to take this into consideration when deciding what project to make.

The white sheets of plastic come already roughened on one side, so you would want to use this for coloring. Be careful though when using markers, as these will bleed through the small scratches of the surface. It is fine for one color design, because when you cut around the edges of your drawing you can  remove the bleeding color that exceeds these limits.

For a more complicated design I'd recommend using colored pencils. I use some old ones I've had since childhood and it works great. Only tried using pencils on the roughened side as I don't think the color will adhere on the shiny side.


These cute mushrooms are entirely colored with pencils. I like using a marker for accents and a more tridimensional look. I think the texture created by the pencils on the plastic surface is really neat! Love this rough, rustic, handmade touch:)

Be sure to use clear varnish to seal the design after baking:) I use a solvent free varnish, the same one I use for decoupage technique. Already tried the one I use for Fimo and it smudges all the marker away:(

Another "problem" I stumbled upon is that some markers will leave strikes of excess color when used on the shiny side of plastic.


For me it is not exactly a problem as I like the handmade texture that this adds to a design, but just in case, test your markers on a scrap of plastic before. Don't worry if the marker leaves a bit of stroke marks, I've only been able to see these in a very zoomed-in picture.

Regarding acrylic paints, from what I've experiences, they don't work. They rub off quite easily after baking, like sunburned skin:)

Ok.....when it comes to cutting, I recommend using a sharp detail scissors and try to rotate the plastic to cut the desired shape rather than the scissors. In really narrow angles try to achieve the v-shape by cutting from both directions till the cuts meet. Think the girl's above underarm v-space.

Careful! If you try to make this kind of cut from a single move, most probably the plastic will crack in the tip of the angle:(


Or use the same technique for the sharp v of these speech bubbles. Aren't these the cutest greetings?


If you have only clear plastic, you have two options: lightly sand it on one side for a frosted look (see the speech bubbles) and for better adherence of color, or use it as it is. If you take the second option, you can use the finish result with the right side being the uncolored one, by this giving it a glass 3D effect.

I have no example of my own for this but I hope you get what I mean:)

One last thing...when using pencils, always color with them as step one and add the marker details after, to prevent smudging. When using only markers...mmmm.. haven't decided yet, I guess you'll have to try and decide for your self :D.

As glue for adding jewelry findings I got best results using a glue called Poxipol, I don't really like the E6000. You have to try see what works best for you.

Well, that's it for now, hope you find my tips useful and please check out my handmade goodies in my Etsy shop (top right of page:).

For more infos on using shrinkies, here are some useful links:


I would love to hear about your adventures with shrink plastic, have you tried it yet?


Wednesday, October 24, 2012

Flea markets and the search for terrarium supplies


Everything about miniature worlds fascinates me. Wether in Disney movies, in children's books, in fairytales for grownups or in whimsical glass jars terrariums, I could spend hours watching them and imagining complicated, Alice in Wonderland like scenarios.
So as we went at the flea market again last Saturday, I considered finding a basket full of these miniature wonderful critters to be a sign:)


It's been so long now since I've been wanting to create dioramas, either as a terrarium or as a world in a shadow box!
Now I have to gather more supplies...twigs, acorns, some dried flowers maybe. I already have fake moss, acorn caps and some really beautiful, mysterious rocks from Iceland.

I'm thinking I could have different themes for the dioramas, like maybe a farm, then a woodland scenario with those cute bunnies:)


Definitely a cat&yarn thing scene, a water and rocks scene with the little green plastic flowers and the stork and some playful, vintage style child's room with those adorable puppies:).


I really love those mininature forest themed terrariums in recycled jars, so maybe I will start with one of those and add some clay mini toadstools too.


Among other goodies hidden in an old basket, I had found these vintage wooden stamps, one with a family of penguins and one with a group of cute rabbits. Both in very good condition and for only 50 euro cents each! There was a nice paper corner punch for the same price and I could not leave it behind so I've got it for the same price as the stamps. You can see the small corner motif near the stamped rabbits:) They seem to like it very much!


What other stuff would you use as terrarium or diorama supplies? I would love to hear about it:)


Sunday, October 7, 2012

October search for color inspiration

 I love autumn. My creative juices seem to flow better while the skies are gloomy and it's raining cats and dogs. 
This weekend, my hubby and I payed a visit to the miniature version of our city's big flea market, the neighborhood's small-but-full-of-hidden-treasures market.
The clouds were hanging heavy on the led sky and we knew we had to hurry. Only a few tables were full with the usual second (or third) hand stuff: clothes, bags, toys, cutlery, paintings, a pair of vintage Dior sunglases, jewelry and some vintage camera lenses.


At this last table, my husband lingered more than the usual 30 seconds, so I knew he must have found something very interesting. He bought two lenses, a 1973's Soligor 28 mm 2.8 and a 1983's Helios44m 56mm.


Now, those numbers didn't mean much to me then, but, as we got home soaked by the pouring rain that had just started, I've decided I wanted to learn more.


So when the storm toned down, we went to a walk around the block, to test the camera by taking some shots that were on my autumn photo check list for a while...
A reason why I love this season so much is because whenever my inspiration levels are low, all I have to do is take my camera and go outside.    


We live close to the forest but the beauty of fall is that every little plant that I wouldn't normally notice has something to show off for, so a walk around the neighborhood will do.


The colors and textures of foliage and fruits in the trees are amazing. I like watching all the transformations plants go through and taking photo samples of their color palletes.
It was a very good opportunity to test my new polka dots rainboots, also:)


Don't you think autumn is the coziest of seasons, with the sweaters, wool socks, hot cocoa, umbrellas, fog, rain, warm colors, hoodies and boots?


All these photos we taken with the Soligor prime lens (except the flying birds one, ©Elle Moss), and I must say, the 10 euros Atti payed for it were a bargain! It takes very crisp shots and the manual focusing is definitely more satisfying then the automatic one.


So, by the time it was dark, I had ended up with these photos and some brand new crafting ideas for my shop:)


You can find the felted acorns featured above (and more handmade rustic home decor) in my Etsy shop, here.


Sunday, August 26, 2012

Newspaper nails tutorial

I've wanted to do this for such a long time, so, when a friend of mine came over for a 2 week visit, this is how we spent a quality girls' afternoon:)

What you need:

- old newspaper cut into 2*2cm pieces
- pastel color nail polish (light grey, white, cream, light pink, coral etc.)
- transparent nail polish
- strong alcohol ( the one pictured here is romanian "tuica" but regular vodka will work just fine)
- some paper towels


Step 1:

Paint your nails with pastel nail polish and let dry for at least 20 minutes. I've used a light grayish-beige hue.


Step 2:

Dip your finger in alcohol for 5 seconds.


Step 3:

On a kitchen paper towel, press the newspaper piece (with the written part on the nail surface) on the wet nail and hold for 15 seconds. Try to press evenly on the entire nail, without moving the paper.


Step 4:

Carefully, slowly remove the newspaper by pulling in the writing direction, from left to right or right to left, not from the base of the nail upwards or vice-versa :).  


Repeat for all fingers. You can also use small images from the newspaper, like this small clock I've found:)


Step 5:

Let dry for 5 minutes. After all nails are dry, apply the transparent gloss. Be careful not to pass more than once (maximum twice) on the same area, as it is possible that the letters will smudge. Just start applying the polish from the middle and add 2 strikes on the sides and that's it!


Enjoy your original nails!

Here are some photos I took of the same technique but a different friend and with a light pink base:

I simply love the lace-torn jeans combo

using my miniature Dior and some fabric petals as  props for  whimsical photos

newspaper nails on light pink base

daylight is my best friend


I hope you enjoyed my mini tutorial:) I would really love to see how your whimsical nails turned out! Just send me some photos and I will post them here ;)


Monday, April 16, 2012

Another glorious day at the flea market

Dear reader,

if you are here it is a good chance that you are as passionate about thrifting as I am. So, I thought I'd make up for my absence by sharing some of my latest flea market finds from last weekend:)

I must say it was one of the best markets in a long time, so if it weren't for the rain to start I'd have most definitely bought double the quantity. For there were soooo many vintage, old, cute, shabby chic stuff that  made my heart pounding like a hammer.

Enough words, here's some eye candy:

vintage porcelain&metal shabby chic pill box


Gucci no.3 mininature perfume bottle
Miss Dior miniature perfume bottle

find the woven chain bracelet tutorial here


vintage porcelain&metal Rococo motif pill box


This botanical theme tea cup makes me crave for my favorite "good night sleep" organic herbal tea blend:)

I love that it has that system inside that makes drinking loose tea so easy and even fashionable:)


loved the charms on this one, couldn't just leave it be in the old box where I've found it


These two vintage sets of tin boxes will make a colorful appearance and brighten up your kitchen shelves.     Or your book shelves. Or your night stand?
  
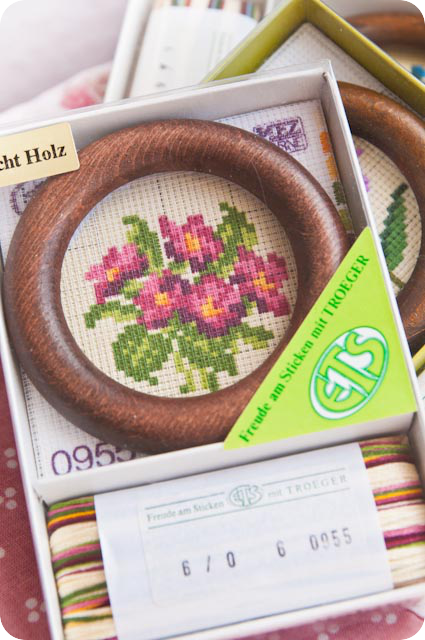
5 gorgeous DIY cross-stitch kits (with real wooden frames)

This bag is my favorite find. I've wanted one of those for such a long time, but none that I've seen so far seemed perfect...now I know why:)

I think it was waiting for me...It's the perfect old school army backpack - inspired bag, with just the right amount of canvas versus leather (not sure it is leather) and metal. And big enough to carry all my stuff around! And was only 3 euros!

Love, love, love it!


Scarves! I can never have enough! Of course I couldn't pass these amazing color combos and textures at prices between 1 and 3 euros...could you? Green is my favorite color, love the warmth of ocre, the softness of the cotton pink one and the rebel feel of the boho-chic pink and brown one:) 


This was pretty much it, left out a pair of jeans and a beanie that weren't that interesting to photograph. I would be over the moon if you'd share some of your flea market finds with me...just to see what other treasures lie around in hidden corners of the world :D

Oh, almost forgot! Also got an old red suitcase that now serves as jewelry storage...and it fits all of it...(almost)...but now it's geting too dark to take a proper photo, so I'll post one tomorrow.

So, till next time, happy thrifting!
Related Posts Plugin for WordPress, Blogger...